Help Central
Need to ask a specific support question?
How to Access Your Account & Presets
View the steps to access your account and where to download your presets after you have placed your order.
Installing Lightroom Mobile
Need steps on installing and using my Presets?
Keep scrolling below or click here for a step-by-step guide.
What you Need to Know
Once your order completes, you have 7 days to download the preset files from within your account. Due to the nature of digital downloads, all sales are final and non-refundable. Please contact me with questions, help, or issues.
What you receive after you order
You will receive 2 emails after you order for the first time. One will be your new account creation with a temporary password, and the other will be your order confirmation.
Account Creation Email
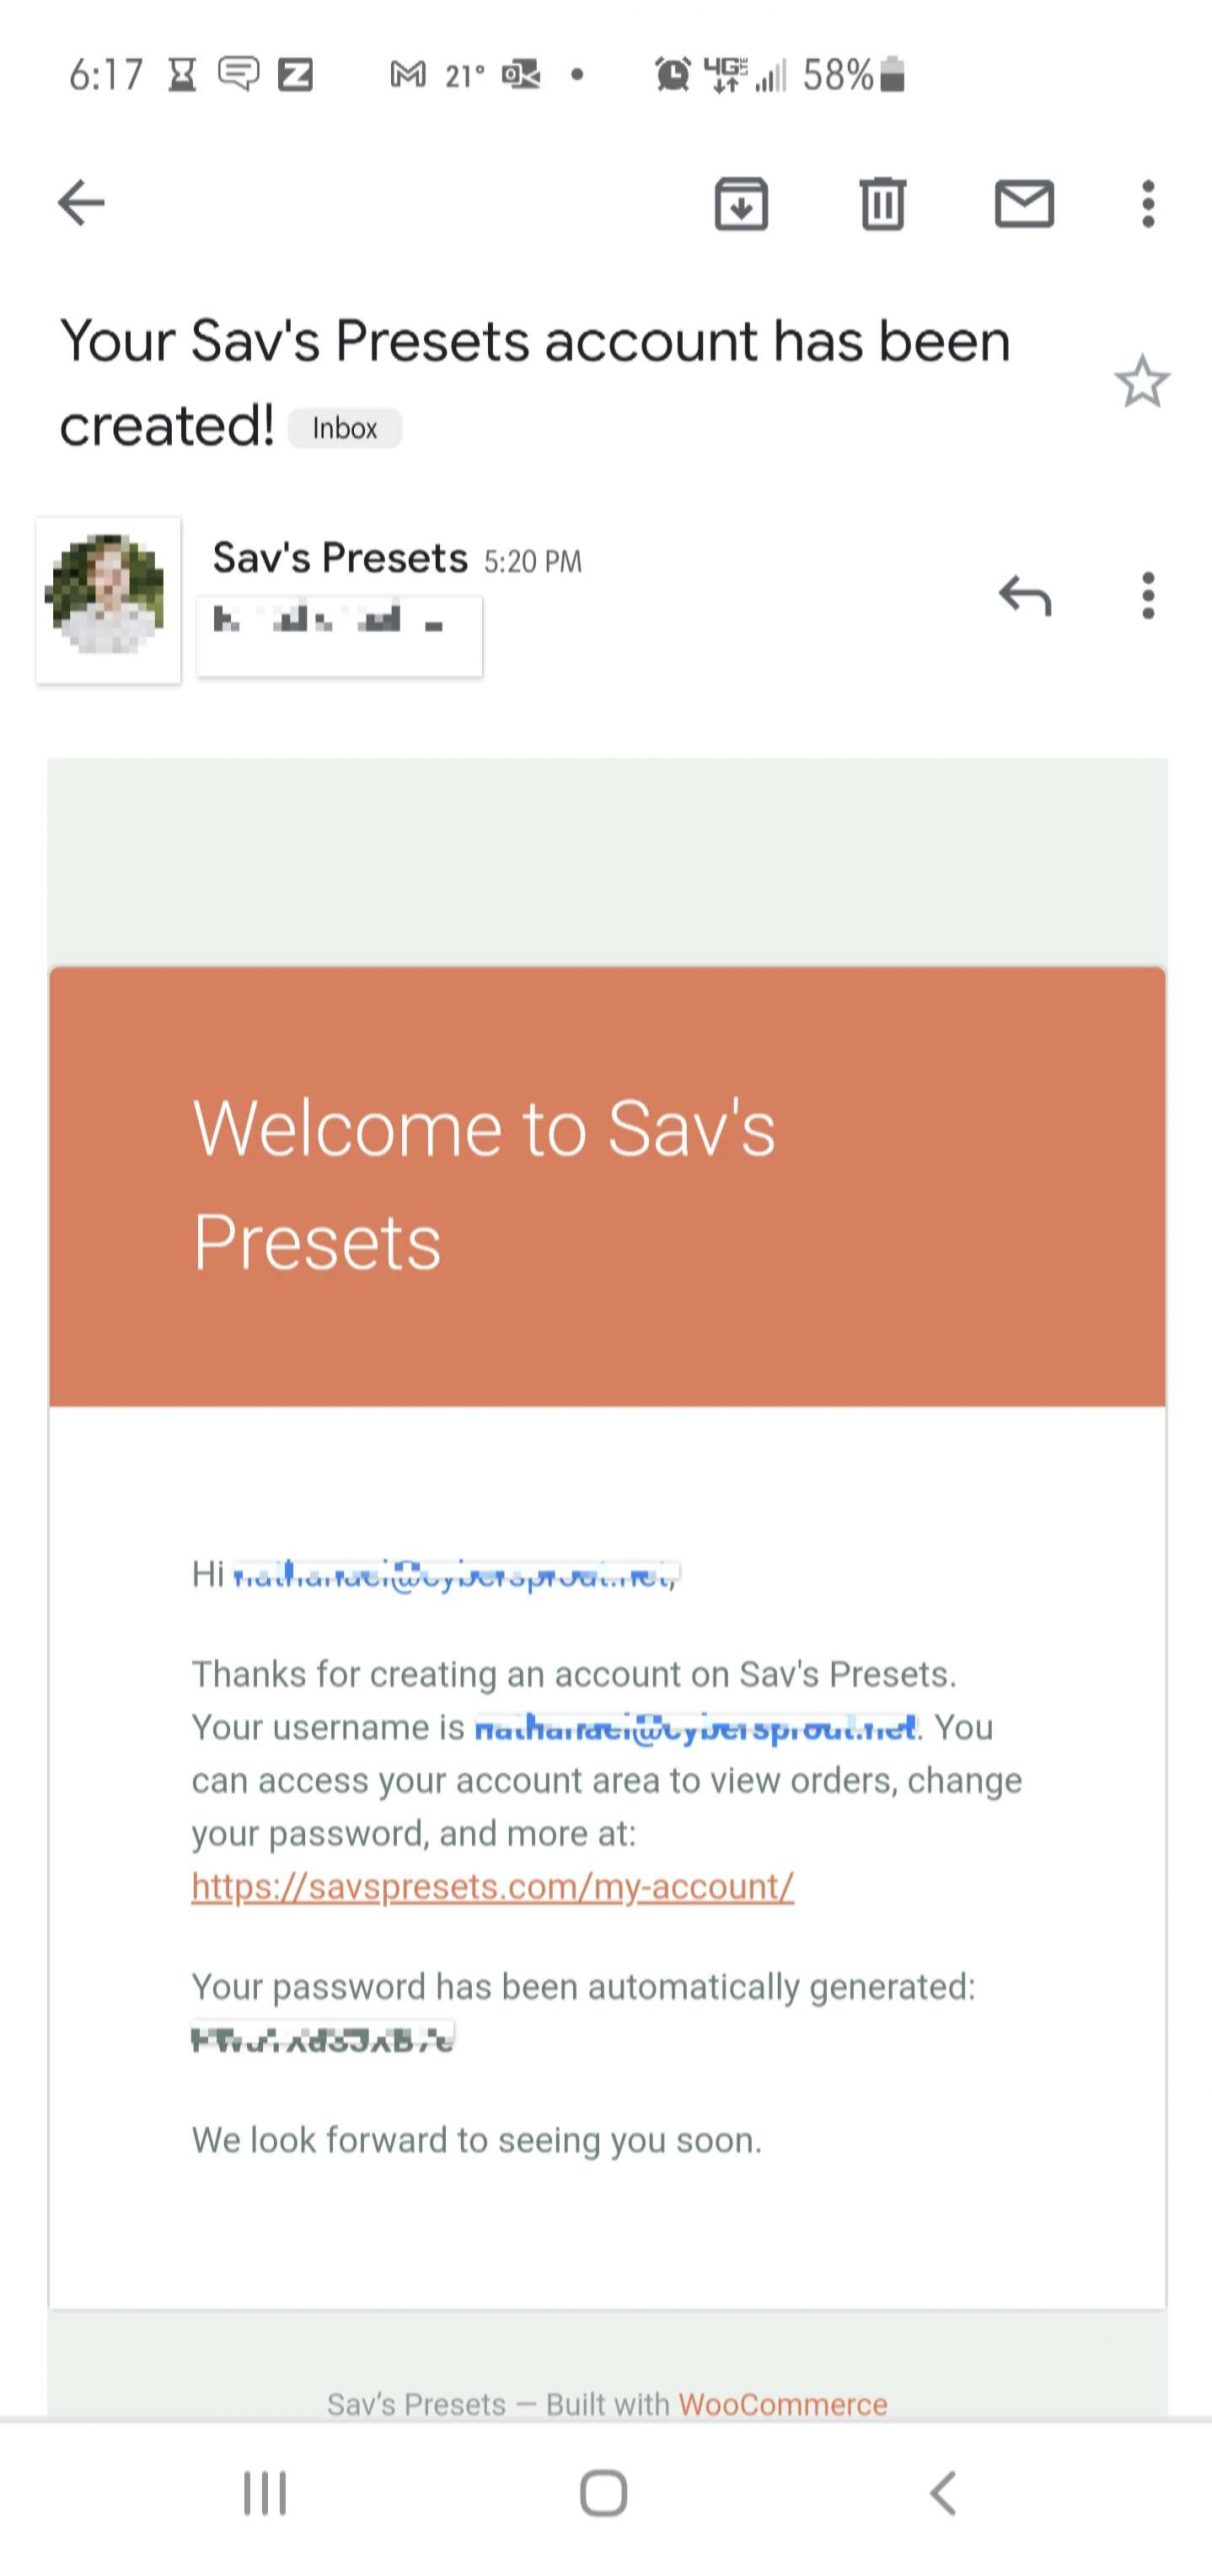
You receive this email only once - after you order for the first time. This includes the link to your My Account page, your username and temporary password.
Order Comfirmation Email

You will receive this email each time you order a preset collection. They have direct links to download the preset files, but you have to be logged in to access them.
Installing & Using Lightroom Mobile Presets Without Desktop
I will step you through how to install my Lightroom Mobile presets straight to your phone into the Lightroom app, without using the desktop version at all. You will then be able to save them as presets on your device and apply them with one click.
Apple Devices

Step 1: Downloading the DNG files to your device
Mobile presets come in a DNG file format. After you complete your order, you will need to log in to your account created at SavsPresets.com to access the download links directly to each DNG preset file.
You can do this by logging into your account here or clicking on the download links in the email you receive to access the log in page.
It is best to log in from your phone in order to download them directly to your phones Camera Roll.
But if you download them from a desktop, you will have to send them to your phone in some fashion (email, dropbox, fileshare, etc).

Step 2: Verify preset files are on your device
You should now have all of your DNG files saved to your phone in your Camera Roll. The files are basically carrying the preset settings. You just need to add them to Lightroom mobile and save presets out of them.
If you go into your photo stream and see them as blank picture files, don’t be alarmed – that’s how they should look.
Open Lightroom Mobile
Now the fun begins! Open Lightroom Mobile. The rest of the steps will take place here.
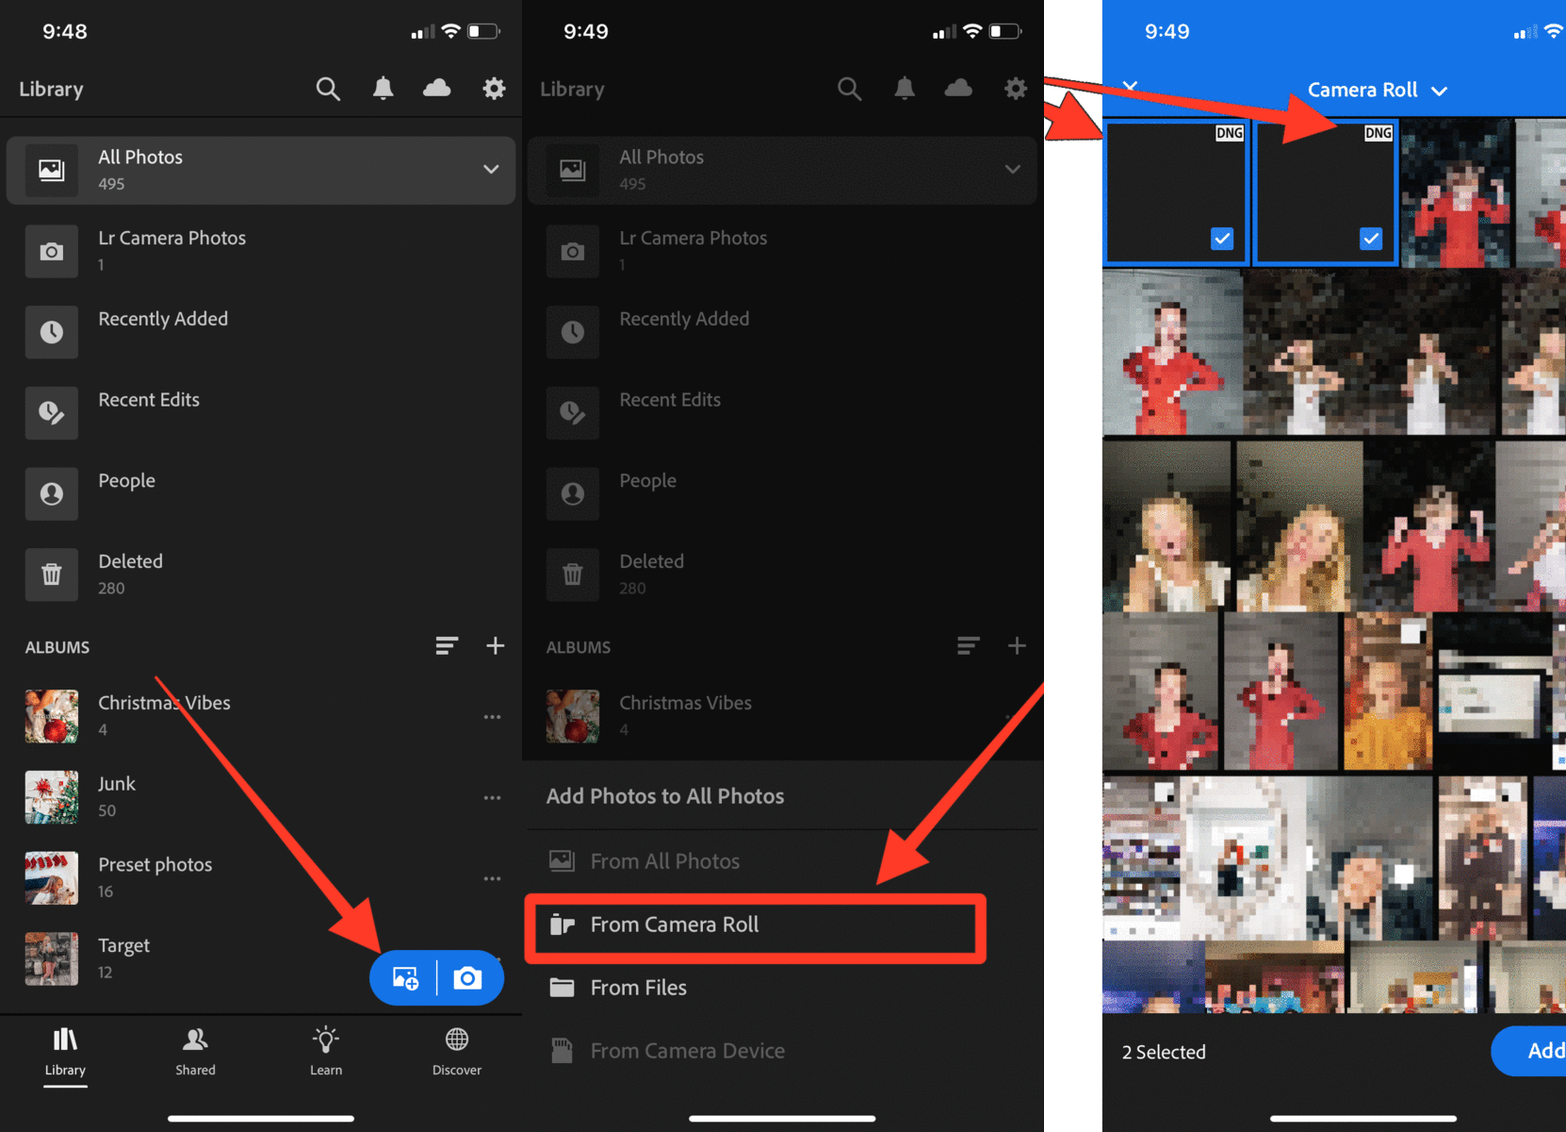
Step 3: Importing preset files into Lightroom Mobile
- In Lightroom Mobile tap on the Add Photos button in the lower right corner.
- Since we downloaded them directly to your Camera Roll through Dropbox or download, select From Camera Roll.
- Now select the DNG presets from your camera roll and import them (Add Photos) into your Lightroom Mobile app.
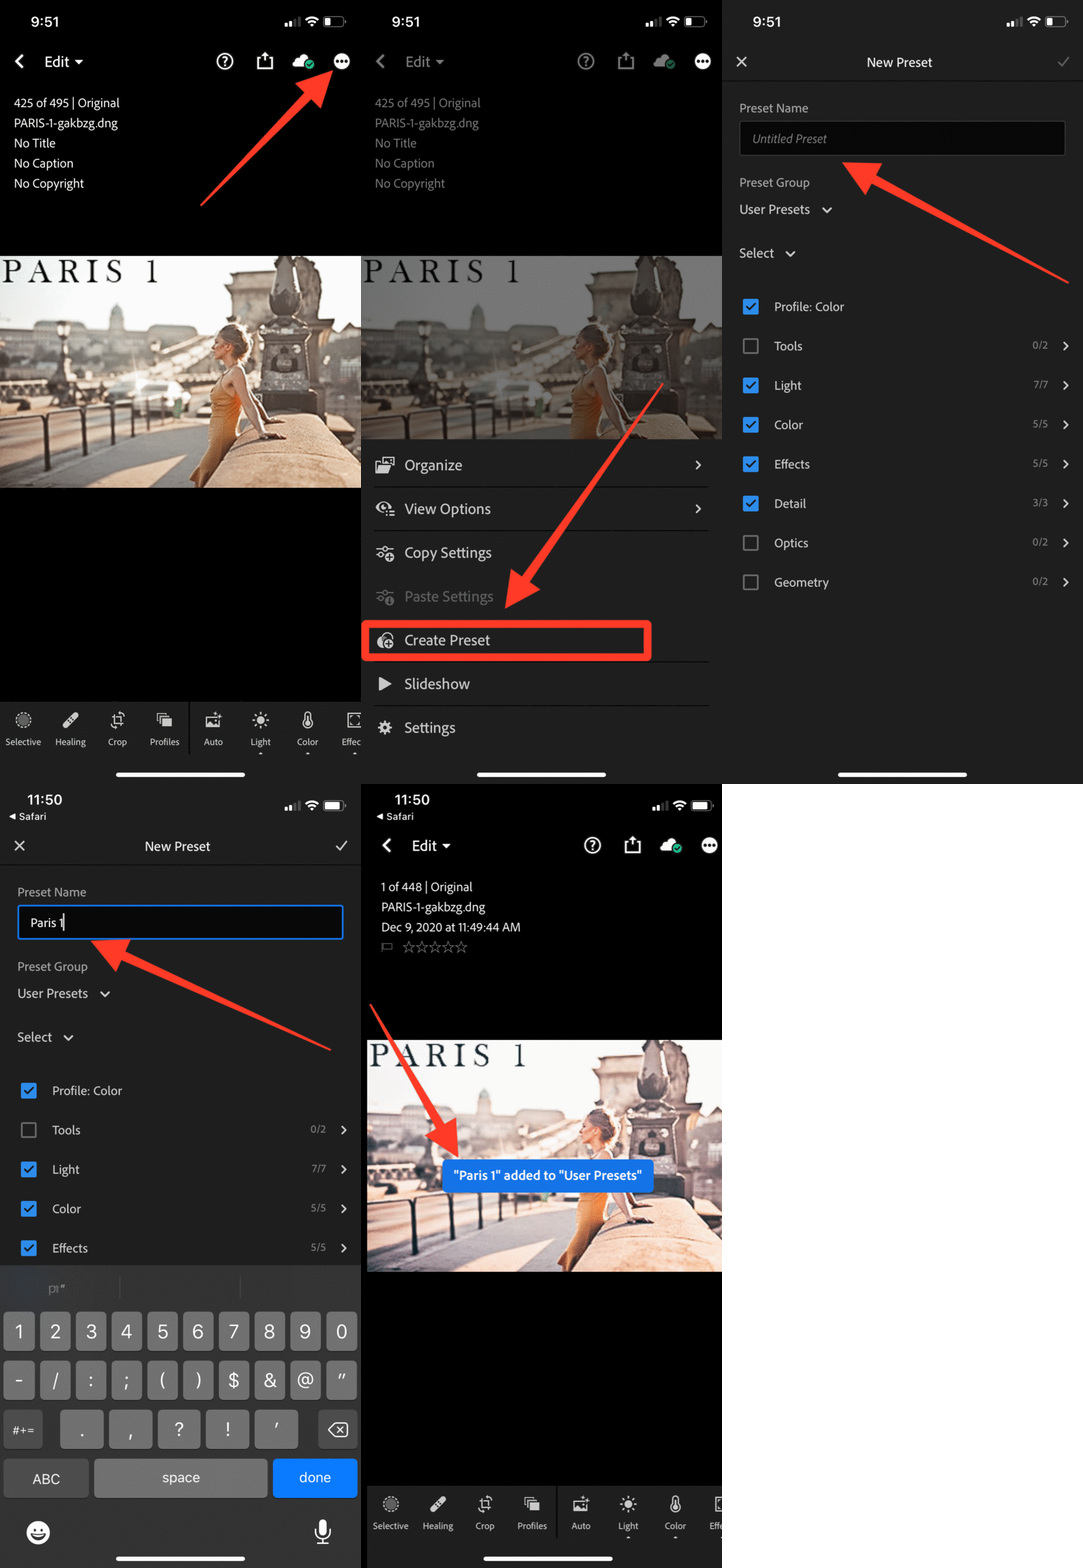
Step 4: Save the Settings as Presets
Now you should have all of your DNG files imported into Lightroom Mobile.
Locate the imported files and open one of them.
- Tap on the three dots in the top right corner of the app.
- Now select Create Presets from the menu that popped up from the bottom.
- Name your preset how you want, but do not leave it blank.
- Optionally, you can create preset groups if you have a lot of presets and want to keep them organized.
- You don't have to change the checkboxes as they are already pre-checked.
- To finish saving just tap the checkmark icon at the top right corner.
The preset should be added. Repeat these steps for each DNG file as you will need to save each preset separately. You only need to do this once!
Step 5: Using Lightroom Mobile Presets
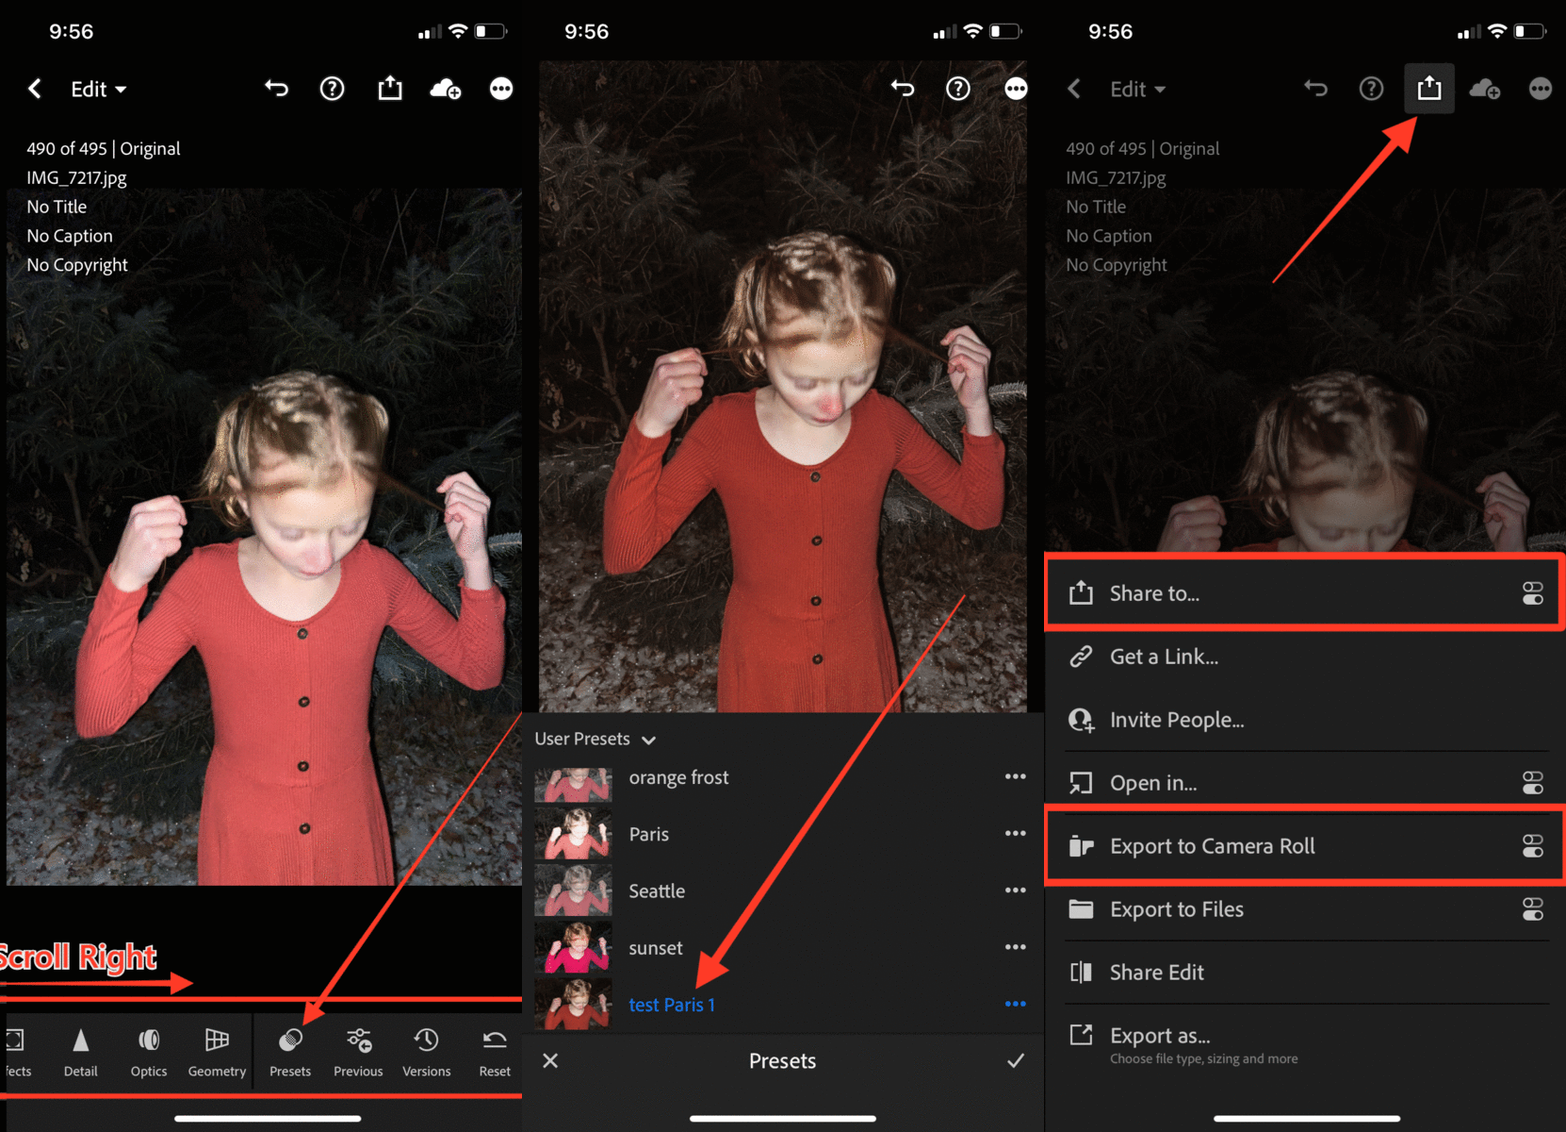
To apply your new presets to one of your photos, just go back into your library within Lightroom Mobile and open one you’d like to edit. Remember: you may need to Add Photos to your Lightroom Library from your camera albums in order to edit them.
- Scroll right (or swipe the menu left) to find the Presets icon in the menu at the bottom of the screen and tap on it. Make sure the Preset Group that’s selected is the one where you saved your new presets, if you did that step. If you saved them in the User Presets group, select that.
- To apply a preset to the photo, just tap on a preset from the list and then tap on the checkmark. You can play with the settings if you don’t like how it looks. As well you can edit the photo and make other adjustments if you like, after you’ve applied the preset.
- Once you have applied all your setting adjustments, you can tap the upload/share icon at the top menu and share the photo, or save it back to your camera roll.
That is it!
You now know how to download & import the preset files into Lightroom Mobile, and save the preset settings to use on your own photos without needing a desktop! Please contact me if you have any other questions or comments.
Android Devices

Step 1: Downloading the DNG files to your device
Mobile presets come in a DNG file format. After you complete your order, you will need to log in to your account created at SavsPresets.com to access the download links directly to each DNG preset file.
You can do this by logging into your account here or clicking on the download links in the email you receive to access the log in page.
It is best to log in from your phone in order to download them directly to your phones Camera Roll.
But if you download them from a desktop, you will have to send them to your phone in some fashion (email, dropbox, fileshare, etc).
Step 2: Verify preset files are on your device
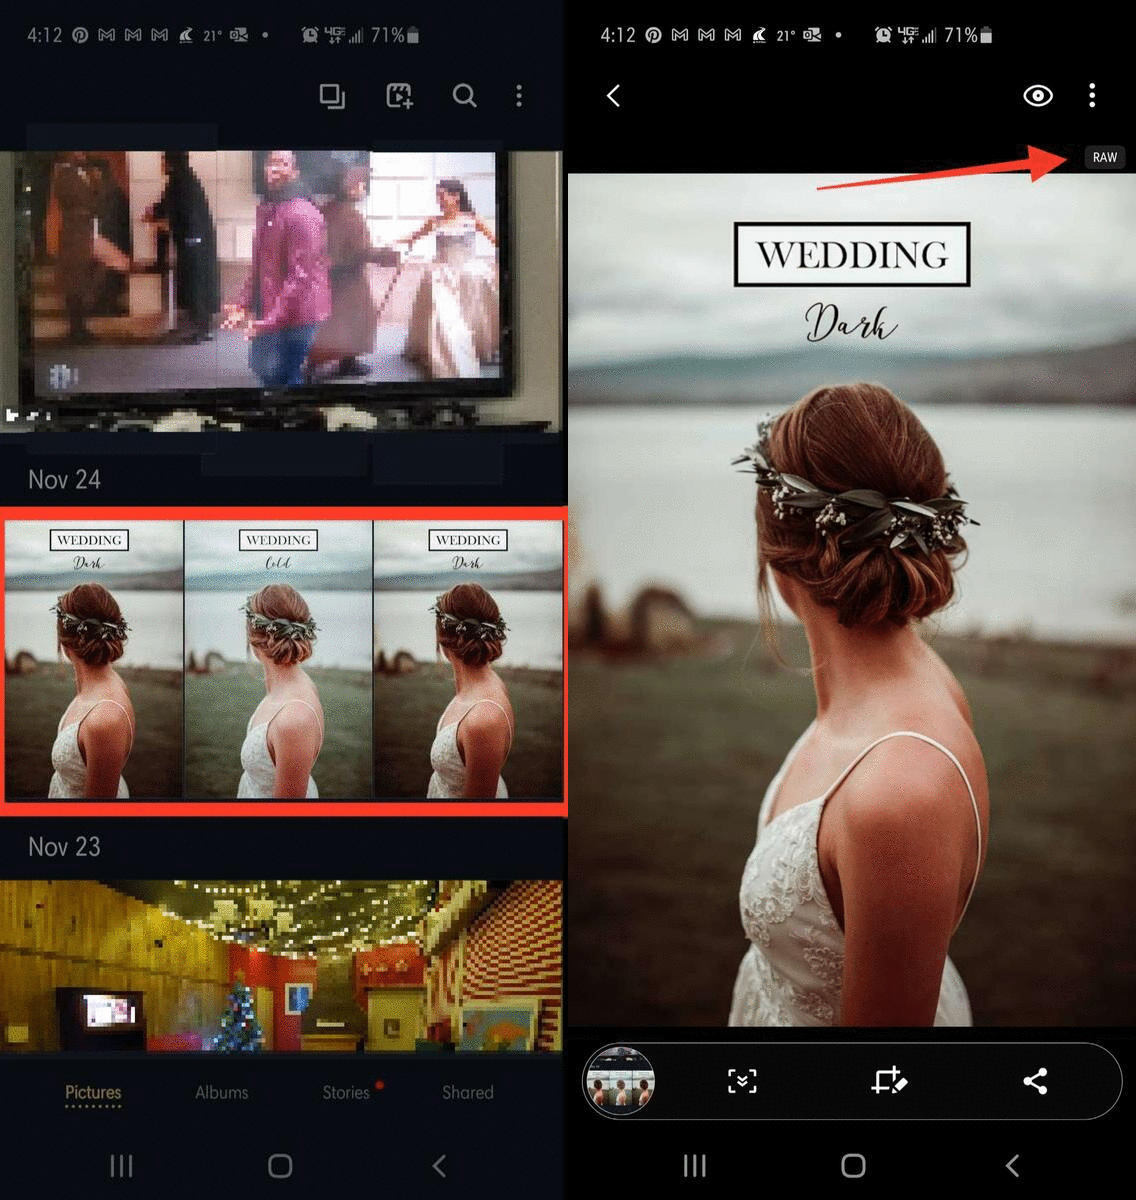
You should now have all of your DNG files saved to your phone in your Camera Roll. The files are basically carrying the preset settings. You just need to add them to Lightroom mobile and save presets out of them.
On an Android device, they will look like photos in your photo stream rather than blank picture files like Apple displays them. Also they are labeled as 'RAW' files instead of DNG like on Apple.

Open Lightroom Mobile
Now the fun begins! Open Lightroom Mobile. The rest of the steps will take place here.
Step 3: Importing preset files into Lightroom Mobile
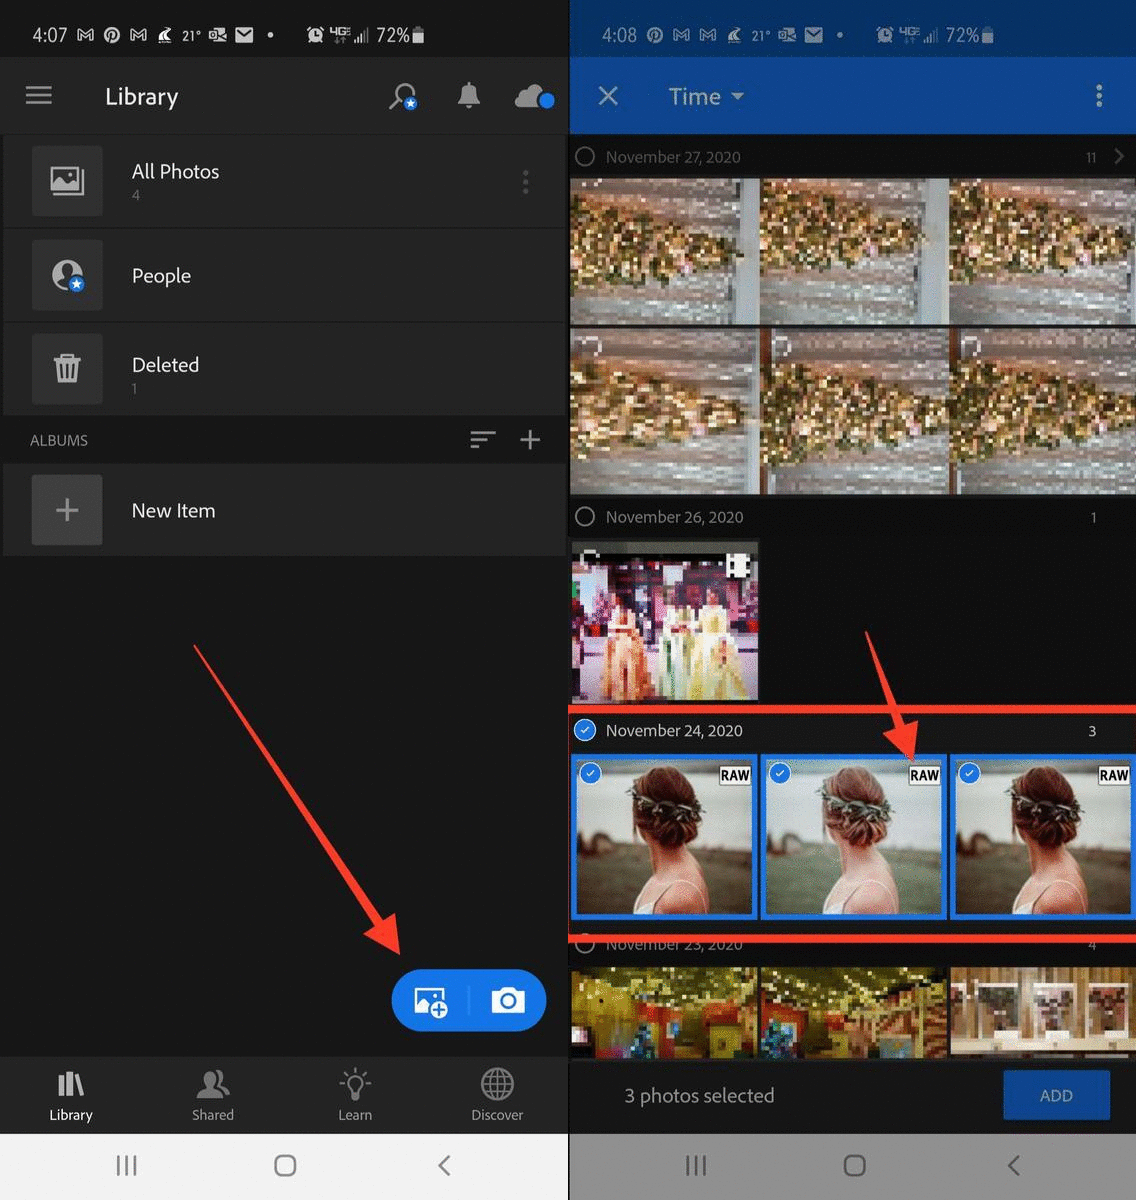
- In Lightroom Mobile tap on the Add Photos button in the lower right corner.
- Your camera photo album will automatically display. Select the DNG/RAW file presets from your camera roll and import them (Add Photos) into your Lightroom Mobile app.
Step 4: Save the Settings as Presets
Now you should have all of your DNG files imported into Lightroom Mobile.
Locate the imported files and open one of them.
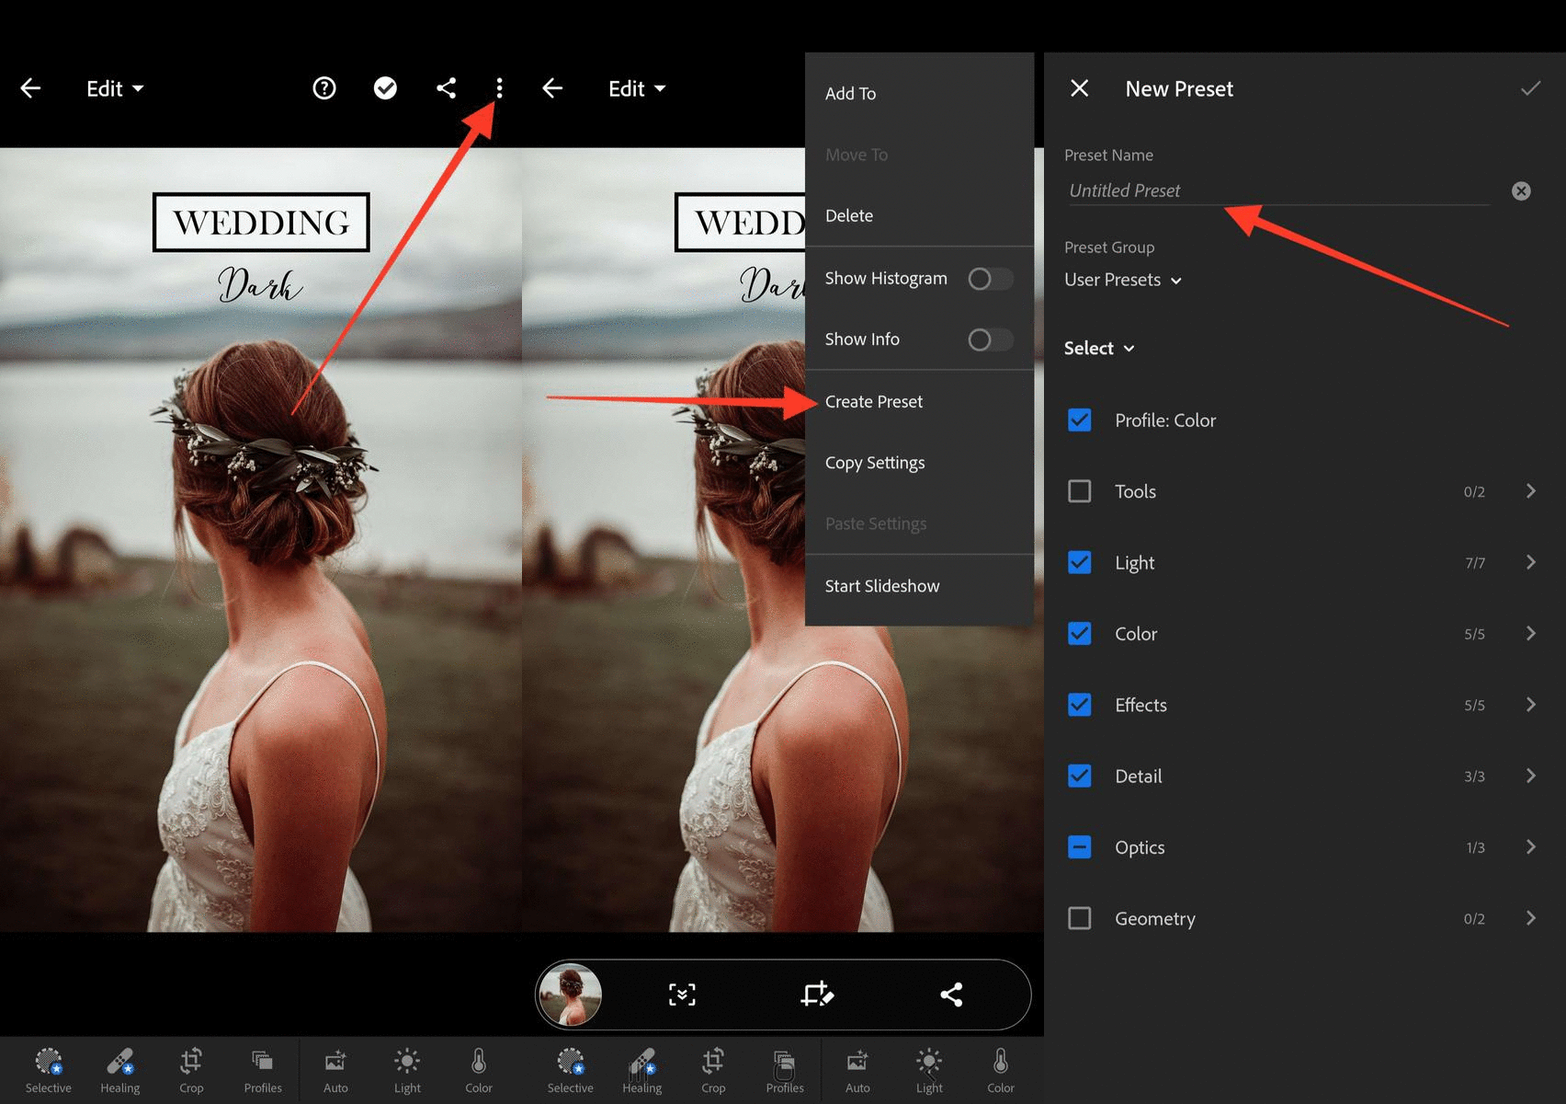
- Tap on the three dots in the top right corner of the app.
- Now select Create Preset from the menu that opened from the top/right.
- Name your preset how you want, but do not leave it blank.
- Optionally, you can create preset groups if you have a lot of presets and want to keep them organized.
- You don't have to change the checkboxes as they are already pre-checked.
- To finish saving just tap the checkmark icon at the top right corner.
The preset should be added. Repeat these steps for each DNG file as you will need to save each preset separately. You only need to do this once!
Step 5: Using Lightroom Mobile Presets
To apply your new presets to one of your photos, just go back into your library within Lightroom Mobile and open one you’d like to edit. Remember: you may need to Add Photos to your Lightroom Library from your camera albums in order to edit them.
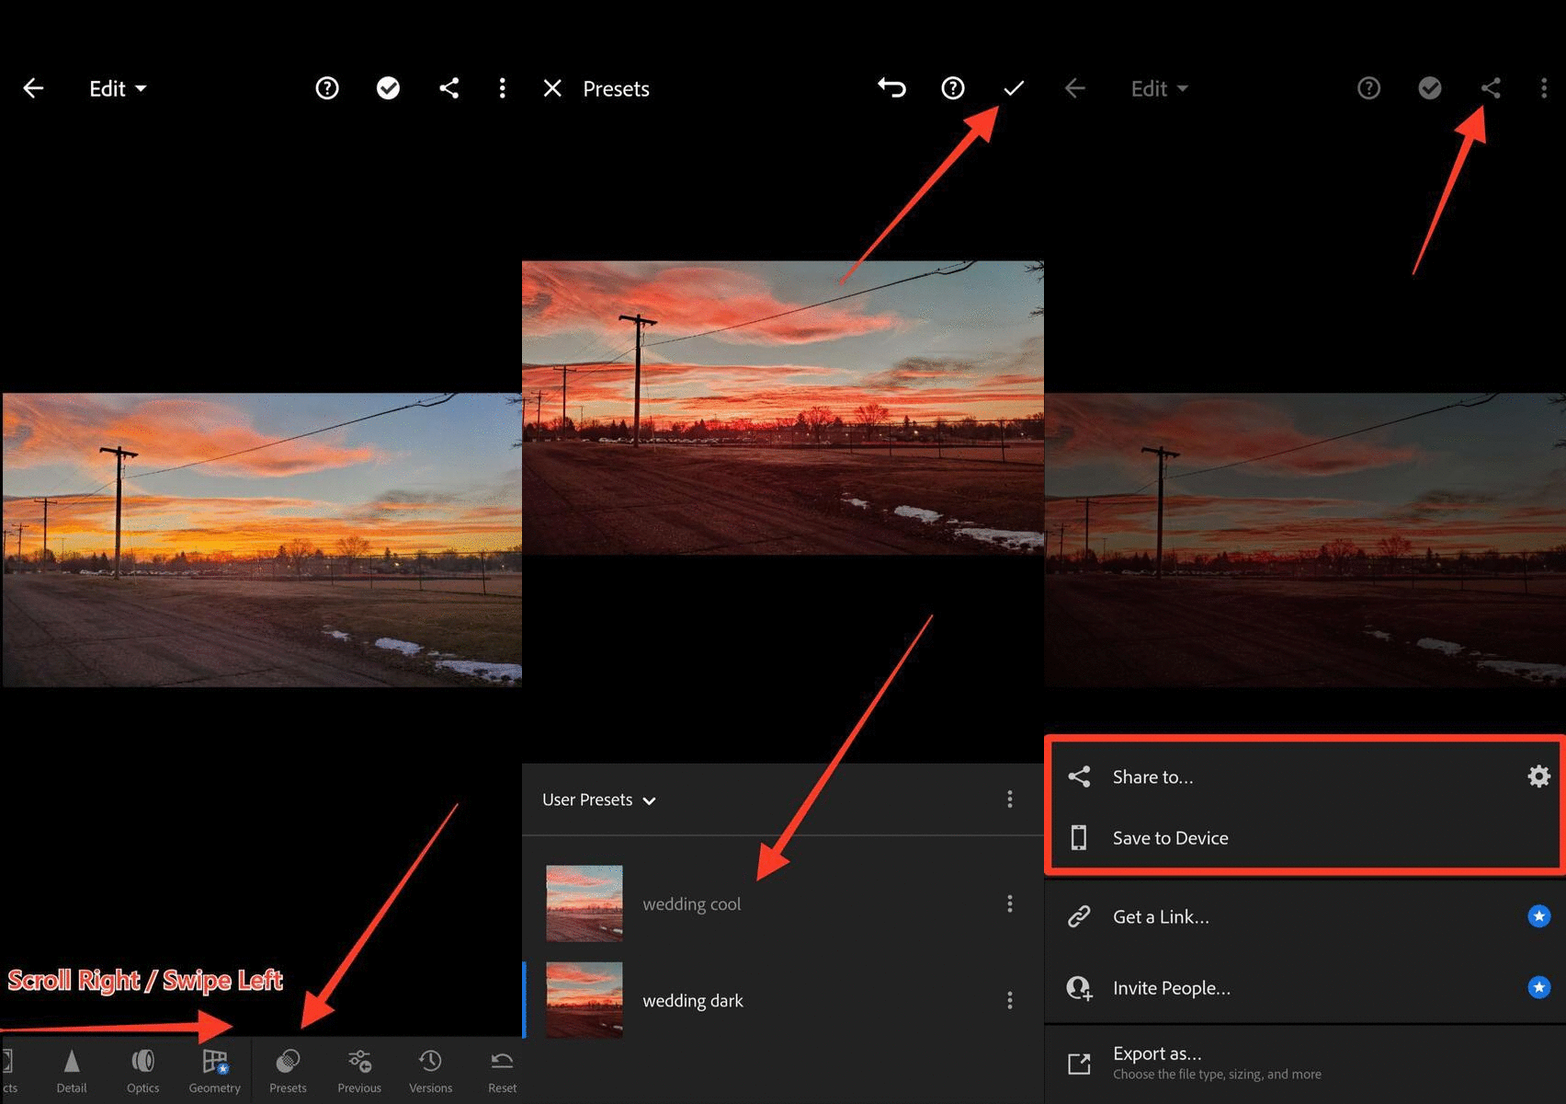
- Scroll right (or swipe the menu left) to find the Presets icon in the menu at the bottom of the screen and tap on it. Make sure the Preset Group that’s selected is the one where you saved your new presets, if you did that step. If you saved them in the User Presets group, select that.
- To apply a preset to the photo, just tap on a preset from the list and then tap on the checkmark. You can play with the settings if you don’t like how it looks. As well you can edit the photo and make other adjustments if you like, after you’ve applied the preset.
- Once you have applied all your setting adjustments, you can tap the share icon at the top menu and share the photo, or save it back to your device.
That is it!
You now know how to download & import the preset files into Lightroom Mobile, and save the preset settings to use on your own photos without needing a desktop! Please contact me if you have any other questions or comments.


